- Published on
Invest in your digital security with pi-hole and wiregaurd
- Authors

- Name
- Vinayak Ganapuram
- @vinayakkg
Background
With pandemic everything went remote right from corporate offices, educational institutions and everything else, there was no other choice. Internet is literally at the center of everything we do today. In the physical world, we invest in securing our homes/offices, our physical documents (in lockers) and if you are famous you need a bodygaurd as well. But in the digital world, we don't pay a lot of attention. We use things as they are offered. The devices we use every day that has all the data including our personal data, bank accounts & other financial assets & everything that we store on the device. We no longer need to follow someone or do physical search to know about someone. All we need to do is do a simple search and we get all details from a single place using internet.
Most of the softwares today also track us all the time, drop cookies and boat loads of javascript. And there are malicious websites that spread malware, virus and causes various other kinds of nasty things. Hence our devices become the primary target of attack; cybersecurity incidents on the rise everywhere. Internet is a recent phenomena and the adoption is still at nascent stages. So thinking of security in the digital world may only happen as we discover and understand the challenges involved.
We need to start investing for security in the digital world as well in the same way as we think of securing ourself in the physical world.
Here are some of the options that we can start immediately and most of them require little or no investment
How to secure
Basic & Free Options
Keep your software on all devices updated
Use HTTPS only websites as much as possible (esp. where you enter data)
Use latest versions of only known browsers like Google Chrome or Microsoft Edge or Safari or Firefox
Install only known apps from valid sources like google playstore, app store Dont install unknown apps
Use 2 factor authentication wherever possible & strong passwords. Use password management tools like keepass
adblock - needs an app & is device specific
Dont use free wi-fi :)
Today we will look at some of the advanced options as this is mostly an ignored area and often folks think its not easy to do it or requires a lot of investment (time & money).
Using Raspberry Pi (for home network only) 💻
if you have a raspberry-pi lying at home, you can use pi-hole, follow install instructions here and set up your raspberry-pi as your DNS server. Pi-hole protects you from ads, trackers, suspicious/malicious websites, et al.
But this setup won't protect you beyond your home network. Also it wont protect you when you phone automatically switches to Mobile Internet when the wi-fi coverage is low at certain parts of your home. And you don't get any protection if you are outside home.
So it does not cover you fully and also reveals our identity.
How about securing your network access everywhere on the go?
Here we discuss a slightly advanced option
Using pi-hole & VPN on VPS 🔐☁️
Since we would like to secure our network everywhere on the go, we will have to setup something on the public internet, i.e. public cloud.
In the next few steps, we will go through setting up a VPN and pi-hole on the same cloud instance and learn how to secure our network.
Using a vpn(Virtual Private Network) allows you to secure your network all the time without having to work about leaving wi-fi network zone.
It changes your IP address and masks your virtual location. It encrypts all data and protects your devices.
VPS ☁️
For public cloud, I was looking at various options, have an account on AWS and Azure but wanted something very nimble and cost effective not only in terms of VM cost but also for bandwidth usage. You will have to pay at least 50 USD for 500GB of bandwidth.
Refer below image for AWS Cloud.

I tried Linode, Digital Ocean in the past - they all offer 100s of GBs of bandwidth with each VM. I tried Vultr this time which gives a 30day free access and promises to give a virtual machine at 2.5 USD with 500 GB data at the base plan.
Initially I used a 5 USD VM(1CPU/1GB RAM & 1TB network) on vultr to set this up and things worked great. Then I got my hands on a 2.5 USD VM and setup pihole there.
Here are the steps to setup vpn with pi-hole.
Install Steps 💿
ssh-keygen (Optional if you have an existing key)
You don't need to this if you would like to use password based auth and dont want to use SSH Keys for accessing server. SSH Keys are secure, work on asymmetric encryption
ssh-keygen -l -f /Users/vinayak/.ssh/keyname
Copy the pub part of the above output to the vultr console and paste it there so that vultr can use that key when creating a new linux VM
cat /Users/vinayak/.ssh//Users/vinayak/.ssh/keyname | pbcopy
login to VM
Now login using the SSH key
ssh -i key ubuntu@ipaddress
OR Login using password authentication
ssh ubuntu@ipaddress
Don't use root, on Ubuntu you get non root ubuntu by default, lets use ubuntu for installation.
Install cloudflared
First, install latest cloudflared version. We need this to run DNS over HTTPS (secure DNS) and not use the default DNS available on the VM by default. We want to ensure DNS requests from the cloud VM get requested via secure channel, hence DoH
wget https://github.com/cloudflare/cloudflared/releases/latest/download/cloudflared-linux-amd64.deb
Then run this command to install cloudflared
sudo apt-get install ./cloudflared-linux-amd64.deb
Now lets run cloudflared on using the below command
sudo ./cloudflared proxy-dns --port 54 --upstream https://1.1.1.1/.well-known/dns-query --upstream https://1.0.0.1/.well-known/dns-query
This command will run cloudflared on port 54 for making DNS queries over HTTPS.
pi-hole install
Open other ssh session or use screen (in the above session) and run the below command
curl -sSL https://install.pi-hole.net | sudo bash
Go through the steps and you can do next with the default options itself. At the end, you will be shown credentials to access your pihole - do note them. In case you forget, you may regenerate using the below command
pihole -a -p
You can access the admin interface for pi-hole using the https://public-ip/admin.
Its not easy to manage iptables, we will use ufw to configure firewall rules on the machine
Lets enable admin panel access using ufw.
sudo ufw app list
sudo ufw allow "Apache HTTP"
using cloudflared for DNS
Now change the contents of 01-pihole.conf
Open the config file sudo vim /etc/dnsmasq.d/01-pihole.conf
Here comment #server=1.1.1.1 OR #server=8.8.8.8 and add the line server=127.0.0.1#54
Remember we ran the DoH over port 54 using cloudflared earlier
Then change /etc/pihole/setupVars.conf Comment lines starting with #PIHOLE_DNS
Save and quit.
Now check if network service is running and disable and stop if running.
sudo systemctl stop systemd-resolved.service
sudo systemctl disable systemd-resolved.service
Now create a service using cloudflare service that we had installed at the begining, so that we can use Cloudflare as the DNS provider in DoH mode.
To create the service file, run the command sudo vim /etc/systemd/system/dnsproxy.service
The contents for the service
[Unit]
Description=CloudFlare DNS over HTTPS Proxy
Wants=network-online.target
After=network.target network-online.target

[Service]
ExecStart=cloudflared proxy-dns --port 54 --upstream https://1.1.1.1/.well-known/dns-query --upstream https://1.0.0.1/.well-known/dns-query
Restart=on-abort

[Install]
WantedBy=multi-user.target
This is the file that will make sure our queries are sent securely (more privacy). Save and quit.
Enable this service and restart sudo systemctl enable dnsproxy.service
Install VPN now 🔐
We will be using wiregaurd VPN as it is much more lighter (~4000 LOC) & performant than the other VPN options like OpenVPN or IPSEC. It consumes less battery (userful for phone) & also maintains the same bandwidth as one would get without VPN.
Run the below command to being VPN installation
curl -L https://install.pivpn.io | bash
Go through the next steps as guided, you may choose the default options - choose wiregaurd for VPN option.
At the end our vpn is ready to use now.
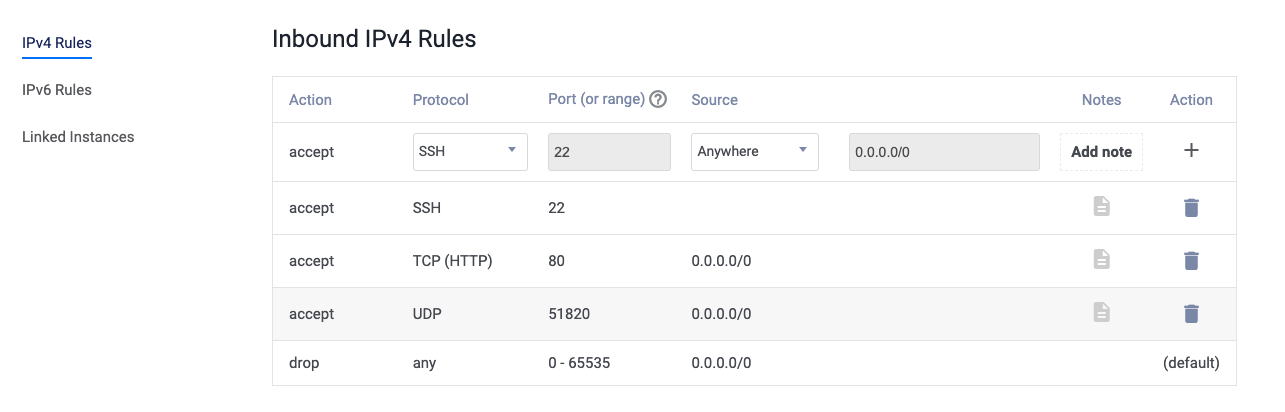
Open Ports
VPN installer automatically adds 51820 port (wiregaurd port) to iptables during installation. Vultr also has a firewall that you need to setup in order to allow this port.
Vultr's tooling and ecosystem is quite standard when compared to other cloud providers. So you will find yourself at home.
Running Tests
Lets start running some tests now. Add some users to pivpn using pivpn add
To be able to use this on a phone, you may generate qr code using pivpn -qr and choose the respective profile for which qr is needed.
You are now connected to wiregaurd vpn and your network is secure (encrypted) & configured to allow only domains you need access.
Overall Experience on Browsing
I have seen almost no issues from the time I started using vpn with pi-hole on all my devices. The number of ads have almost(some youtube ads still do appear).
You may configure the youtube blocklist as a job to continuously update the block list but that won't guarantee youtube ads.
git clone https://github.com/kboghdady/youTube_ads_4_pi-hole.git`
cd youTube_ads_4_pi-hole
sudo crontab -e
# And add the following line at the end
0 */1 * * * sudo /home/pi/youTube_ads_4_pi-hole/youtube.sh >/dev/null
Since I was still seeing youtube ads, I looked for options and discovered freetube app that is available for all desktop OS. Free-tube is a great tool to use and is a privacy first tool. It fits my needs. Free-tube does not support login though.
For mobile there are not options, but I discovered Invidious - An open source alternative front-end to YouTube and it works on mobile phone browser really well - no login support though.
Post using the above youtube alternatives the amount of blocked traffic has gone down from 12% to 6%.

I feel very confident my children using the devices too now.
Recently after moving to Reliance Jio, I was unable to use the cloudflare VPN and felt its better to move to something more permanent where I had a lot more control.
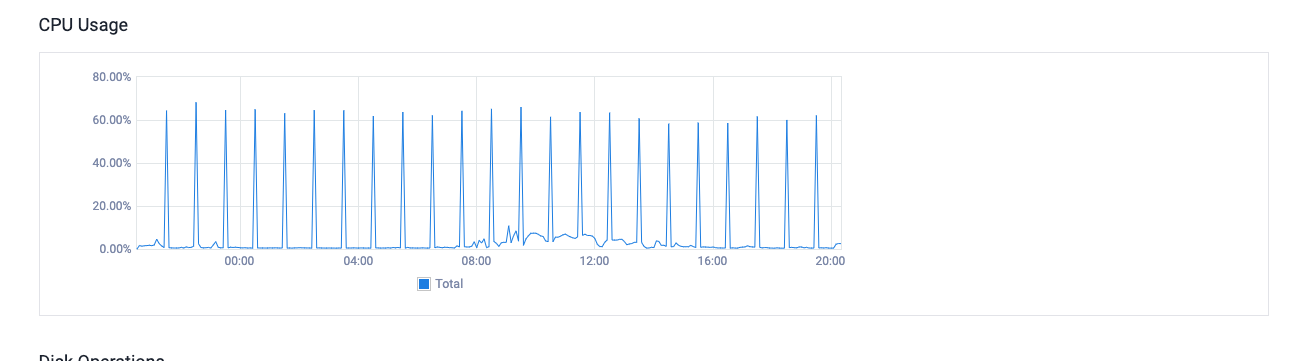
On the VM performance, it barely consumes any CPU expect for the hourly youtube lists refresh.
Securing pi-hole & VPS
Since we have setup pi-hole on VPS and is accessible via public internet and the access requires just a password, we need to have some form of 2FA.
2FA on pi-hole is open feature request since its mostly used within home network. Since I have set it up to be used from the internet over public cloud, I am using wiregaurd vpn to allow pi-hole to be used only when connected to the vpn.
We can also setup firewall on VPN or on ubuntu to allow pi-hole admin only on certain its, but lets keep that away for time being.
Since there is no 2FA, we will try and setup basic authentication on lighttpd as below
$HTTP["url"] =~ "^/admin/" {
auth.debug = 2
auth.backend = "plain"
auth.backend.plain.userfile = "/var/www/.lighttpdpassword"
auth.require = ( "/admin/" =>
    (
    "method" => "basic",
    "realm" => "Password protected area",
    "require" => "user=username"
    )
	)
}
Create a file with .lighttpdpassword with username:password as contents. Follow this link if you need more details.
If you would like to setup 2FA for ssh password based login, please use this link for setting up 2FA.
Closing thoughts
I had put this under the back burner for a long time, only to realize recently that it was straight forward and very much needed.
Its a small investment of 3-5 USD per month and I don't have to worry about any tracking or logging that happens with other providers.
And more importantly I get to script a lot of stuff which was otherwise not possible.
References
Catching and dealing with naughty devices on my home network (scotthelme.co.uk)
Running my own DoH relay and getting Pi-hole protection away from home! (scotthelme.co.uk)
Reminder on how I set up a kickass VPN server with PiHole and encrypted DNS · GitHub
WireGuard - Fast, Modern, Secure VPN Tunnel - FOSDEM 2017 Presentation
What WireGuard® teaches us about simplicity and efficiency NordVPN