- Published on
Setting up your personal website
- Authors

- Name
- Vinayak Ganapuram
- @vinayakkg
I have been long contemplating on having my personal website and start publishing my journal( I maintain notes based on the lores from OneNote) to share my learnings with everyone and learn more in return. I've been writing on and off on LinkedIn but having your personal domain for a website is a different feeling and helps to market yourself and establish your identity. Having your own website also gives you independence from platforms (like LinkedIn, Medium, facebook, etc.) and you are no more worried about the changes on the platform.
Also, there have been requests from some of the folks for guidance on setting up their personal website, so I thought I will share my experience with everyone.
Choosing a TLD
To set up a website, you need to first choose a name that you'd prefer. I went with my own name since that helps me establish my presence on the internet and also provide a single point of reference for anyone who wants to know more about me.
The next thing was the TLD (Top Level Domain). And with 1000's of TLD's available, I had many options to choose and get represented as an individual.
I did not want a com, net or org since they will not represent me. I was contemplating between a blog or dev and I settled with dev since I am a developer by choice and will be one for a while. My writings will also be around software development/technology in general.
Once I had zeroed on TLD, I knew where I had to go. Since this TLD is owned by Google, I went ahead and signed for my domain name vinayakg.dev(chose initials from my last name to make it shorter and easy to remember). It was also the cheapest amongst all the other providers I had searched then. On a side note, .dev is secure by default and is preloaded on all major browsers (Chrome, Safari, Edge and Firefox), which also meant I needed a SSL/TLS certificate.
Provider
As a next step, I had to find a home for hosting the website and I did not want to set up WordPress or any other CMS heavy systems. I had previously optimized a WordPress website to render faster and to have google pagespeed scores of ~100 on both mobile and web, but I felt it was too heavy for my needs and I also did not want to be tracking the Wordpress Vulnerabilities.
With the recent surge in JAM applications and the splurge in Headless CMS space, it felt the best spot to be in.
While I was thinking of all options, my need was to host a static site to show my content and nothing else. I was thinking of latest JAM stack (netlify, gatsby, aws amplify) et al. I was also thinking of hosting my static site on Cloudfront and set up my own serverless API, all of this for an already solved problem, felt like it wasn't value for money. "Don't reinvent the wheel" was my mantra from scratch till the end.
I had also considered and tried hosting on blogger (owned by Google). You can host for free on your domain without having to worry about bandwidth costs or hosting costs. But you cannot host a website on the root domain for you will need a 'www' or something similar as a sub-domain.
Fortunately, I took a step back and remembered Github Pages. Yes, THE GitHub pages! And there I had it! I had read about this some time back and I recollected that I could set up my website for free (yes that's right) and I could use git to manage my entire content. git is familiar with all developers and hence I went ahead with Github Pages.
Setup and Experience
Netlify was also one more option that was worth considering, which I did, but it hit some blocks.
After a few searches for setting up Github Pages, I landed on a couple of articles. I had to scour through all of them to figure out the best way (simplest) :smile:
This article was the most simplest and I followed it to push the pedal a bit further.
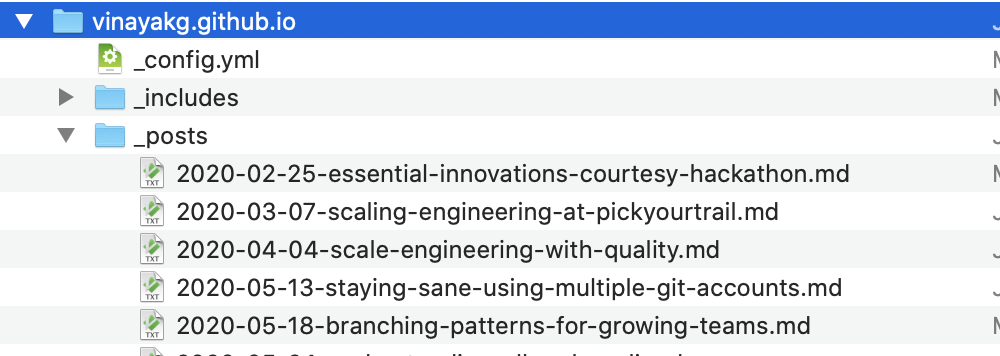
Now the task was to add the articles I had written to show up on github, so I added them as posts, Please see below.
The next thing about Github pages is that you can write content using Markdown. I have been using Markdown for many years to write technical documents and I've always loved using it! Markdown formatting is consistent across all browsers/devices and is easy to learn. Tools like typora, markdownpad and zettlr makes it very easy to write in Markdown. I would personally prefer Zettler.
Steps
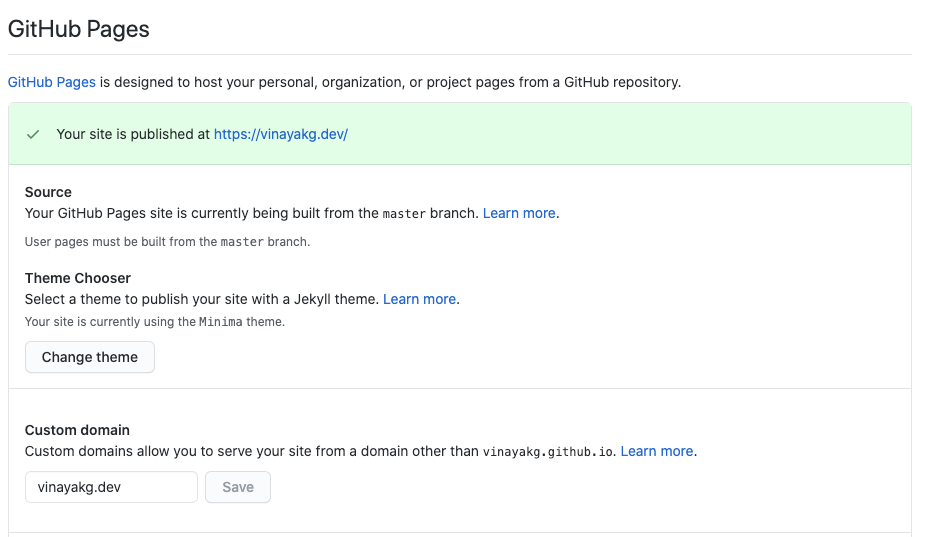
After pushing the posts to git (with other files as per above blog) to my repository, I had to just enable GitHub pages for my repository named as vinayakg.github.io
After some tinkering, I was able to access my pages, with the generated URL.
Now, it was time to set up an A record on my DNS provider's website ( google domains) and then, I was set.
Google Domains’ UI was not very intuitive and is very different from other providers like route 53 or DynDNS or dnsmadeeasy.
I checked the links here and here, and then after adding those entries, I was able to resolve my domain.
I also had to enable HTTPS to access my website, since my domain was .dev and is secured by default (basically .dev is on HSTS list). Once I enabled HTTPS on my site, it took only a minute or two for the TLS certificate to be assigned. Github Pages uses LetsEncrypt to issue certificates for personal websites created on GIthub Pages.
I tried the same steps for setting up my custom website on Netlify, but the HTTPS option took a long time to get enabled, and after waiting for 10-15 mins I gave up. I was not sure of the time delay as Netlify used LetsEncrypt for TLS Certificates and I already had a certificate assigned against my domain or it could be an error too on the Netlify side.
With that, the setup will get completed and we will be ready to start publishing articles one after the other.
Visibility and Maintenance
Now with our setup completely done, I just had a few questions on how to link all my posts to show on one page, how to tag my articles, how to add dates and other things and how to set up the About page, and other sections, etc.
If you use some other provider(outside Github Pages), you might end up choosing an image provider (paid or free) whom you will forget to renew or maintain and your website in the future will not be rendering images. I've seen that happen multiple times and it did trigger me when I came across the same issue even in renowned writers' blogs. Thus, I decided to use the same GitHub repository itself for storing the images.
One important thing to remember is - How to ensure Google and other search engines crawl our pages? If that doesn't happen, our content will never be discovered organically. Yes, SEO management is equally important for your website!
So I looked around and Jekyll had a lot to offer. Github pages are built on Jekyll, which is based on Ruby on Rails framework. This was the first time I had tried Jekyll and Ruby on Rails, though I had heard and read it many times in the past.
Then, I started exploring jekyllrb and figured that I could do a lot of stuff with easy steps to follow!
There is also an admin/CMS for the entire jekyll website that you can configure.
Steps
I followed the installation link for MacOS and followed the steps to setup jekyll on my machine, almost all the instructions worked, except for my default ruby was pointing to old (~~ Not sure how it got installed~~ - it got installed with a brew package).
The ruby I installed usingbrew was not available on PATH, so had to set that in the path
export PATH="/usr/local/Cellar/ruby/2.7.1_2/bin:$PATH"
Then I ran the below commands and I was able to render the changes locally`
gem install bundler jekyll
jekyll new my-awesome-site
cd my-awesome-site
bundle exec jekyll serve # render locally
SEO
Make sure you enable sitemap generation and SEO-tag generators so that search engine crawlers can crawl and present our website content on search results based on relevant queries.
theme: minima
plugins:
  - jekyll-feed
  - jekyll-seo-tag
  - jekyll-sitemap
You may easily add themes to your website from the many the available themes for jekyll. I use minima.
Things that surprised me
Once you put all your posts in _posts folder with yyyy-mm-dd-pagetitle.md format, jekyll uses this information to figure DateTime and order your posts accordingly on the landing page (index.html).
There is OOB(out of the box) RSS support.
There is a default About Page which is a good start.
You may use the Permalink tag in each post if you need custom links (we all need :))
And of course themes for quick playing around
Next Steps
- Change the theme
- Setup Commenting on the blog, I don't like disqus or Facebook commenting (loads of trackers and assets - render the website slow)
- Choose a new theme
- Try admin interface and explore possibilities.
References
You are free to clone/fork my repository to set up your own website.